這篇文章會介紹一下,在 ONOS 上 P4 相關的模組和功能,以及怎麼開發 ONOS APP 與設置 ONOS,讓 ONOS 可以控制 p4 switch 的 pipeline。
背景介紹#
P4Runtime#
P4Runtime 是 P4 API Working Group 制定的一套基於 Protobuf 以及 gRPC 的傳輸協定,他可以提供不同的 P4 交換機和不同的 SDN 控制器一套統一的 API 標準,提供控制器直接透過 p4runtime 將編譯出來 p4 pipeline 直接上傳到 p4 switch 上、設置 p4 pipeline 的 table entry 以及接收 packet-in 的封包和 counter 的資訊等功能。
ONOS 架構#
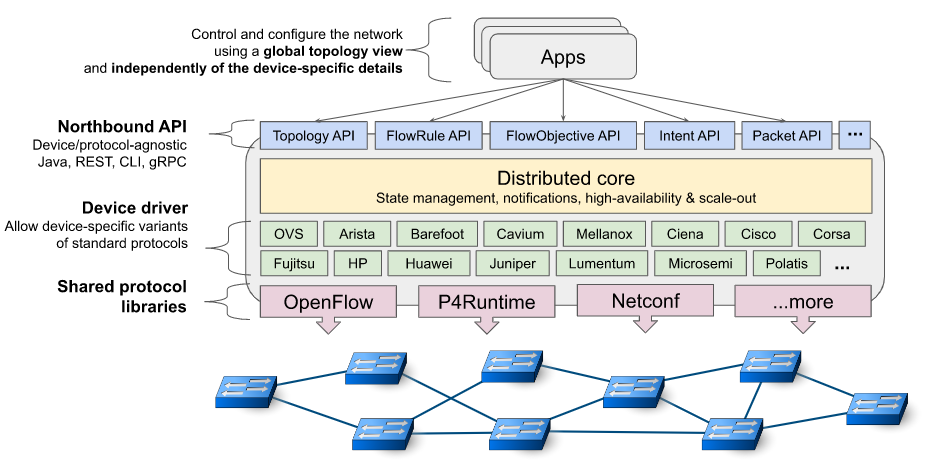
ONOS 使用分層架構和介面抽象的方式隱藏了底層交換機和和控制協定的具體內容,讓上層的應用可以用統一的 API 來管理網路的行為,因此上層網路可以用完全相同的方式來控制 Openflow switch 及 P4 switch,也可以不用理會各個 switch table 順序和具體規則的下達方式。
ONOS Flow programmable#
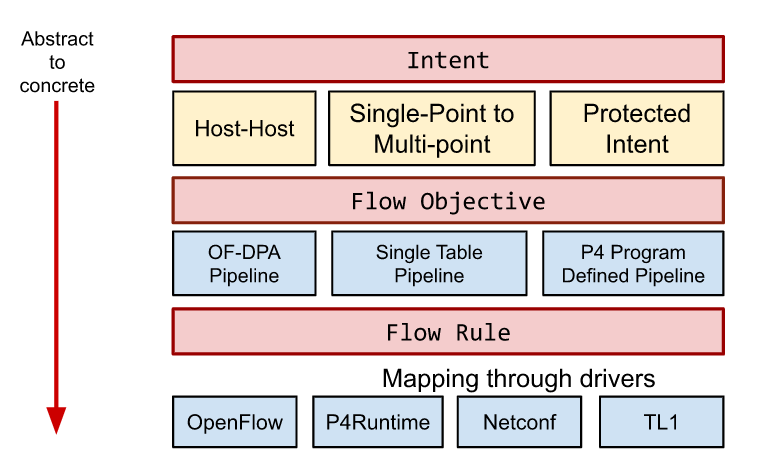
即便是在北向提供給使用者的 API,ONOS 也對其做了很多層級的抽象,讓使用者可以自由決定要使用哪一個層級的 API。
在 flow rule 的部分,ONOS 大致上提供了三個層級的抽象,分別是 Flow Rule, Flow Objective 及 Intent ,不論在哪一個層級,我們主要都是要操作兩個集合 Selector 和 Treatment
Selector 決定了哪些封包受這條 flow rule 管理。一個 Selector 包含了若干個 Criterion ,ONOS 透過 Enum 定義了常用的 Criterion Type,來對應封包的不同欄位,例如 IPV4_SRC , ETH_SRC 等。
Treatment 則是 Instruction 的集合,一個 instruction 通常對應到對封包的某個欄位進行修改,或著指定封包在交換機的 output port。
三個抽象層積的差別在於這兩個集合套用到的對象,在最高層級的 Intent ,我們操作的對象是整個網路流,除了 Selector 和 Treatment,我們還要定義整個網路流在 SDN 網路的入口 (Ingress Point) 和出口 (Egress Point),ONOS 核心的 Intent Service 會幫我們把一個 Intent 編譯成多個 FlowObjective。
由於 Intent 操作的是整個網路流,在這個層級定義 Output port 是沒有意義的,但是由於在 ONOS 使用的 JAVA API 是共通的,所以 intent service 會忽略掉這個 instruction,這個在 ONOS 的實作上是很重要的觀念,對 treatment 裡的 instructions,底層的編譯器只會取他可以處理的 instructions 往更底層送,對於不可以處理的 instructions,有些會有 warnning log,有些會直接跳 exception,更有的會直接忽略,因此如果 selector 和 treatment 的執行結果不符合我們的預期,有可能是有些不支援的 instruction 在轉換成交換機可以懂得規則的過程中被忽略的。
FlowObjective 操作的對象是一台網路設備 (通常是一台交換機),同樣我們定義一個 Selector 和 Treatment ,告訴這台交換機我們要處理哪些封包和怎麼處理。
最底下到了 Flow Rule 這個層級,Flow rule 這個層級對象是交換機上的一張 table,因此他加入了 table id 這個欄位。一個 FlowObjective 可能會包含多個不同的 instruction,例如我們要修改封包的 mac address,修改 ip 的 ttl 欄位,同時也要決定這個封包的 output port,這些 instruction 在 flow objective 層級可以包含在一個 treatment 內,但是在實際的交換機上這些 instruction 可能分別屬於不同的 table,因此一個 flow objective 會需要對應到一條或多條得 flow rule,這依據底下交換機的不同、傳輸協定的不同而不同,因此 ONOS 引入了 Pipeliner ,Driver 可以實作 Pipeliner 的介面,讓 ONOS 知道如何把 flow objective 轉換成 flow rules。
P4 in ONOS#
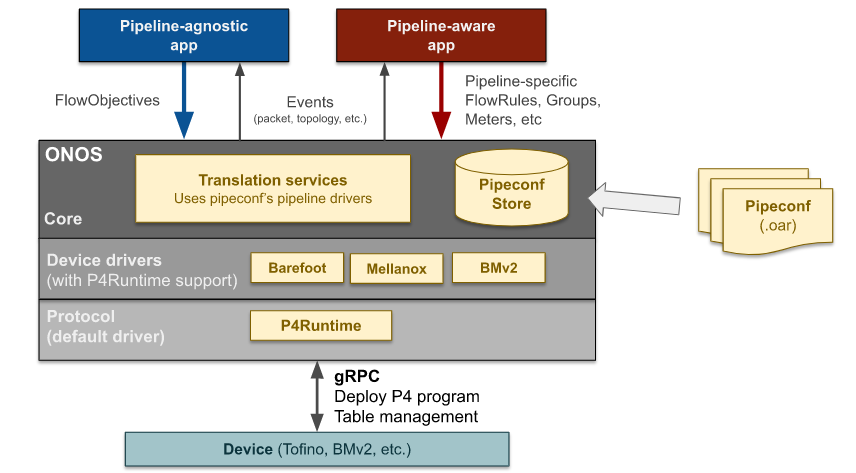
上圖是 p4 在 ONOS 南向架構上的組件
在 Protocol layer 由 P4Runtime 組件實作 p4runtime procotol,維護 switch 的連線和具體的 gRPC/Protobuf 傳輸內容
接著是 Driver layer,不同的 p4 switch 在 pipeline 的結構等方面存在差異,因此在 ONOS 設定交換機資訊時要根據不同的 Switch 選擇 driver
- 如果是 bmv2 switch 使用
org.onosproject.bmv2,如果是 tofino 交換機使用org.onosproject.barefoot
最上面是 ONOS 核心,這邊有 translation services 和 pipeconf 架構。p4 交換機的特色是能透過 p4lang 定義出完全不同的 pipeline,在使用 ONOS 控制 p4 switch 的時候,我們就需要針對 pipeline 定義註冊 pipeconf,ONOS 核心可以調用 pipeconf 將 flow objective 或 flow rule 的 flow rule 轉換成真正可以下達到 p4 pipeline table 上的 entry。
在 ONOS 核心定義的這套 pipeconf 及轉換架構被稱之為 Pipeline Independent (PI) framework,因此 ONOS 相關的 class 和 interface 都會有一個 PI 的前綴。
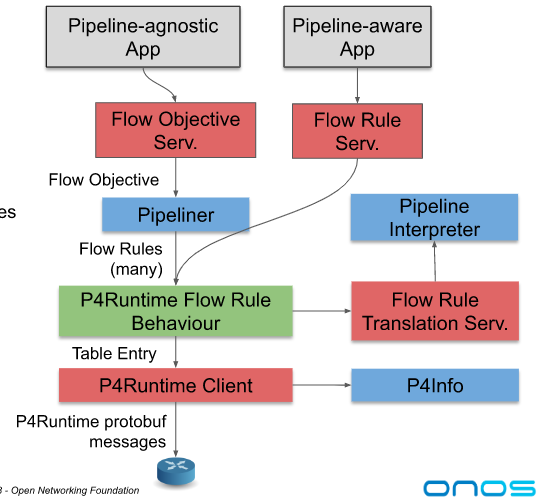
另外就要提到 Pipeline-agnostic APP 和 Pipeline-aware APP 的差別,這邊指的都是北向介面上面處理網路邏輯的 APP,差別在於 Pipeline-agnostic app 完全不考慮底下的 pipeline,因此通常操作的是 flow objective,而 pipeline aware app 必須知道底層 pipeline 的架構,直接產出特定的 flow rule。
開發 Pipeline-agnostic APP 的好處是他足夠抽象因此可以應用在各種不同的交換機和網路,但是我們就需要額外實作 pipeliner 等編譯器來做轉換,因此直接如果只針對單一 pipeline 的情況下,直接開發 pipeline aware app 會比較簡單。
Pipeconf 開發#
在使用 ONOS 控制 p4 switch 時,最基本要做的就是撰寫 pipeline 對應的 pipeconf。一個完整的 Pipeconf 會包含
- 從 p4 compiler 拿到 pipeline 資訊檔案,p4info, bmv2 json, Tofino binary….
- PipeconfLoader: 一個 pipeconf 的進入點,向 PiPipeconfService 註冊一個或多個 pipeconf,定義 pipeconf 的 id, 對應的 interpreter, pipeliner, p4info 檔案路徑等資訊。
- Interpreter: 主要負責兩件事
- 提供 ONOS 核心資訊並協助將 common flow rule 轉換成 protocol independent flow rule,包含了 table id 的 mapping, 欄位名稱和數值的轉換等
- 處理 packet-in/packet-out 的封包,當封包從 p4 switch packet-in 到 controller 時,會把 metadata (input port 等資訊) 當作 packet 的一個 header 附加在 packet 中,一起送到 controller,pipeconf 需要解析封包,將封包資訊提取出來。當封包 packet-out 時,同樣需要 metadata 轉換成 pipeline 定義的 packet-out header,附加在封包內送至交換機,pipeline parser 才能重新將資訊解析出來處理。
- Pipeliner: 負責將 flow objective 轉換成 flow rule
但是 Interpreter 和 Pipeliner 的功能是不一定要實作的,如果對應的功能沒有被實作,那北向的 APP 就只能呼叫比較底層的 API 而無法調動 flow objective 等功能。
開發目標#
下面會用一個非常簡單的 p4 pipeline 作為範例,我們預期要實作一個基本的 Layer 2 switch pipeline,使 ProxyARP APP 和 Reactive Forwarding APP 能夠正常的運作。(使用 bmv2 和 ONOS v2.7.0 開發)
建立 ONOS APP#
跟任何其他 ONOS 模組一樣,pipeconf 可以作為一個獨立的 ONOS APP 開發,再安裝到 ONOS 上,所以首先建立我們的 simepleswitch APP
onos-create-app
Define value for property 'groupId': me.louisif.pipelines
Define value for property 'artifactId': simpleswitch
Define value for property 'version' 1.0-SNAPSHOT: :
Define value for property 'package' me.louisif: : me.louisif.pipelines.simpleswitch
pom.xml#
在 pipeconf 的開發中,使用到 p4 相關的 api 並沒有被包含在 onos 標準 api 內,需要額外加入 p4runtime-model 這個 dependency。
<dependency>
  <groupId>org.onosproject</groupId>
  <artifactId>onos-protocols-p4runtime-model</artifactId>
  <version>${onos.version}</version>
</dependency>
另外可以在 onos 的 dependency app 列表內加入 pipeline 對應的 driver,這樣啟動 pipeconf 時就會自動啟用相關的 driver app,而不用事前手動啟動。
<properties>
  <onos.app.requires>org.onosproject.drivers.bmv2</onos.app.requires>
</properties>
P4 撰寫#
接著撰寫我們的 p4 檔案,路徑是 src/main/resource/simpleswitch.p4。resource 資料夾在編譯的時候會被附加到編譯出來的 oar 裡面,所以可以直接在 ONOS 執行的時候存取到編譯出來的 p4info 等檔案。完整的檔案在 github 上。
在 simpleswitch 的 ingress pipeline 內只包含一張 table0,用於 L2 的 packet forwarding,使用 send 這個 action 來將封包丟到指定的 output port,在 bmv2 switch 會定義一個 cpu port,當 egress_port 為該 port number 時,封包就會被送至 ONOS,因此 send_to_cpu 這個 action 只單純做 set egress port 這個動作。
control table0_control(inout headers_t hdr,
                inout local_metadata_t local_metadata,
                inout standard_metadata_t standard_metadata) {
    action send(port_t port) {
        standard_metadata.egress_spec = port;
    }

    action send_to_cpu() {
        standard_metadata.egress_spec = CPU_PORT;
    }

    action drop() {
        mark_to_drop (standard_metadata);
    }

    table table0 {
        key = {
            standard_metadata.ingress_port : ternary;
            hdr.ethernet.src_addr          : ternary;
            hdr.ethernet.dst_addr          : ternary;
            hdr.ethernet.ether_type        : ternary;
        }

        actions = {
            send;
            send_to_cpu;
            drop;
        }
        default_action = drop;
        size = 512;
    }

    apply {
        table0.apply ();
    }
}
control MyIngress(inout headers_t hdr,
                  inout local_metadata_t meta,
                  inout standard_metadata_t standard_metadata) {
    apply {
        // 這個後面在介紹
        //if (standard_metadata.ingress_port == CPU_PORT) {
        //    standard_metadata.egress_spec = hdr.packet_out.egress_port;
        //    hdr.packet_out.setInvalid ();
        //    exit;
        // } else {
            table0_control.apply (hdr, meta, standard_metadata);
        // }
    }
}
P4 編譯#
編譯 bmv2 pipeline 可以直接複製 ONOS 內建的 basic pipeline 使用的 編譯腳本,將 Makefile 和 bmv2-compile.sh 這兩個檔案複製到 resources 資料夾下,然後修改 Makefile 把 basic 改成 simpleswitch,並刪除 int pipeline。可以簡單下 make 來完成 pipeline 的編譯。
ROOT_DIR:=$(shell dirname $(realpath $(firstword $(MAKEFILE_LIST))))/..

all: p4 constants

p4: simpleswitch.p4
        @./bmv2-compile.sh "simpleswitch" ""

constants:
        docker run -v $(ONOS_ROOT):/onos -w /onos/tools/dev/bin \
                -v $(ROOT_DIR):/source \
                --entrypoint ./onos-gen-p4-constants opennetworking/p4mn:stable \
                -o /source/java/me/louisif/pipelines/simpleswitch/SimpleswitchConstants.java \
                simpleswitch /source/resources/p4c-out/bmv2/simpleswitch_p4info.txt

clean:
        rm -rf p4c-out/bmv2/*
這個 makefile 主要分為兩個部分。p4 會呼叫 bmv2-compile,編譯出 bmv2 的 p4info 和描述 pipeline 的 json 檔案。constants 則會使用 p4mn 這個 container 生成出一個 SimpleswitchConstants.java 的檔案,這個檔案會把 pipeline 所有 table 名稱、欄位、action 名稱列舉出來,方便 pipeconf 的程式碼直接調用,以 table0 來說,它的完整名稱為 MyIngress.table0_control.table0 ,可以使用 MY_INGRESS_TABLE0_CONTROL_TABLE0 變數來代表。
public static final PiTableId MY_INGRESS_TABLE0_CONTROL_TABLE0 =
            PiTableId.of ("MyIngress.table0_control.table0");
最小可執行 Pipeconf#
撰寫 PipeconfLoader#
接著我們要先寫一個最小可以動的 pipeconf,只包含 PipeconfLoader.java 這個檔案,路徑是 src/main/java/me/louisif/simpleswitch/PipeconfLoader.java,前文提到 PipeconfLoader 的工作是向 PipeconfService 註冊 pipeconf 的資訊,因此我們幫 PipeconfLoader 加上 Component 的 Annotation,讓 activate function 在 APP 啟動時被呼叫,接著在 activate function 裡面去註冊 pipeconf。
以我們的例子而言,我們使用的是 bmv2 的 pipeline,所以我們可以這樣寫
final URL jsonUrl = PipeconfLoader.class.getResource ("/p4c-out/bmv2/simpleswitch.json");
final URL p4InfoUrl = PipeconfLoader.class.getResource ("/p4c-out/bmv2/simpleswitch_p4info.txt");

PiPipeconf pipeconf = DefaultPiPipeconf.builder ()
        .withId (PIPECONF_ID)
        .withPipelineModel (P4InfoParser.parse (p4InfoUrl))
        .addExtension (P4_INFO_TEXT, p4InfoUrl)
        .addExtension (BMV2_JSON, jsonUrl)
        .build ();
piPipeconfService.register (pipeconf);
檔案路徑要填寫相對於 resource 這個資料夾的路徑,另外 addExtension 的內容會根據 switch 的不同而不同,如果我們今天使用的是 tonifo 的 pipeline 那就要改成
final URL binUrl = PipeconfLoader.class.getResource ("/p4c-out/tofino.bin");
final URL p4InfoUrl = PipeconfLoader.class.getResource ("/p4c-out/p4info.txt");
final URL contextJsonUrl = PipeconfLoader.class.getResource ("/p4c-out/context.json");

DefaultPiPipeconf.builder ()
                .withId (PIPECONF_ID)
                .withPipelineModel (parseP4Info (p4InfoUrl))
								.addExtension (P4_INFO_TEXT, p4InfoUrl)
                .addExtension (TOFINO_BIN, binUrl)
                .addExtension (TOFINO_CONTEXT_JSON, contextJsonUrl)
                .build ();
piPipeconfService.register (pipeconf);
測試#
完成 PipeconfLoader.java 就構成了一個可以運作的 pipeconf,為了測試我們使用 opennetworking/p4mn 這個 container 來實驗,p4mn 是一個 mininet 的 docker image,可以很簡單的啟動一個 mininet 的測試拓譜,並使用 bmv2 switch 取代 mininet 原本使用的 openflow switch。
docker run -v /tmp/p4mn:/tmp --privileged --rm -it -p 50001:50001 opennetworking/p4mn:stable
使用這個指令可以啟動一個包含一個叫做 bmv2-s1 的 bmv2 switch 和兩個 host
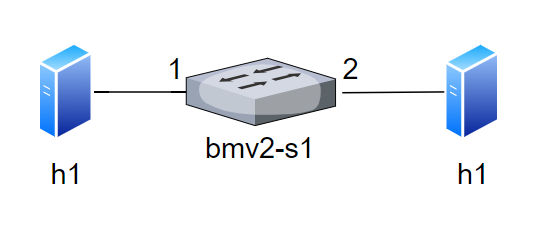
同時會生成一個 onos 的 netcfg 檔案,路徑 /tmp/p4mn/bmv2-s1-netcfg.json
{
  "devices": {
    "device:bmv2:s1": {
      "ports": {
        "1": {
          "name": "s1-eth1",
          "speed": 10000,
          "enabled": true,
          "number": 1,
          "removed": false,
          "type": "copper"
        },
        "2": {
          "name": "s1-eth2",
          "speed": 10000,
          "enabled": true,
          "number": 2,
          "removed": false,
          "type": "copper"
        }
      },
      "basic": {
        "managementAddress": "grpc://localhost:50001?device_id=1",
        "driver": "bmv2",
        "pipeconf": "me.louisif.pipelines.simpleswitch"
      }
    }
  }
}
這個檔案包含了 ONOS P4 需要的所有資訊,主要分為兩個部分,ports 定義了這個交換機所有的 port 資訊。basic 部分,managementAddress 是 ONOS 用來使用 p4runtime 連線到 switch 的路徑,pipeconf 指定了這個 switch 使用的 pipeconf,預設會是 org.onosproject.pipelines.basic,在我們的範例中需要改為 me.louisif.pipelines.simpleswitch。
只要將 me.louisif.pipelines.simpleswitch 的 app 啟用,並上傳 bmv2-s1-netcfg.json,ONOS 就可以成功連線到這個 bmv2 switch,並正常提供北向的 APP 服務了。
如何下 flow rule#
完成 pipeconf 後,我們就可以透過下 flow rule 的方式來讓 switch 工作了,為了要讓 h1 和 h2 能夠互相溝通,最簡單的方法就是將所有 port 1 進來的封包送到 port 2、所有從 port 2 進來的封包送到 port 1。
為此我們需要兩條 table0 的 entry,分別是
- standard_metadata.ingress_port == 1 (mask 0x1ff) → send port=2
- standard_metadata.ingress_port == 2 (mask 0x1ff) → send port=1
由於 standard_metadata.ingress_port 這個 key 是 ternary,因此我們需要包含 mask, port 這個 type 的長度是 9 bits,因為要完全一致,所以 mask 是 0x1ff。
final PiCriterion.Builder criterionBuilder = PiCriterion.builder ()
                .matchTernary (PiMatchFieldId.of ("standard_metadata.ingress_port"), inPortNumber.toLong (), 0x1ff);
final PiAction piAction = PiAction.builder ().withId (PiActionId.of ("MyIngress.table0_control.send"))
        .withParameter (new PiActionParam(PiActionParamId.of ("port"), outPortNumber.toLong ()))
        .build ();
final FlowRule flowRule = DefaultFlowRule.builder ()
        .fromApp (coreService.getAppId (APP_NAME))
        .forDevice (deviceId)
        .forTable (PiTableId.of ("MyIngress.table0_control.table0")).makePermanent ().withPriority (65535)
        .withSelector (DefaultTrafficSelector.builder ().matchPi (criterionBuilder.build ()).build ())
        .withTreatment (DefaultTrafficTreatment.builder ().piTableAction (piAction).build ()).build ();
flowRuleService.applyFlowRules (flowRule);
我們可以透過這樣的方式來下達第一條 table entry,可以發現和平常的 flow entry 不一樣的地方是 table id 使用的是 PiTableId 這個 type,並指定了 table0 的完整 id MyIngress.table0_control.table0,另外 Selector 和 Treatment 分別使用了 matchPi 和 piTableAction 這兩個特別的函數。
我們這邊將只使用 PiTableId, PiCriterion 和 PiAction 定義的 flow rule 稱之為 PI flow rule,PI flow rule 是 onos 的 p4runtime 可以直接處理的 flow rule,所有的欄位名稱都唯一對應到 p4 pipeline 的某個欄位,前面提到這些 PiTableId, PiMatchFieldId 等都會在 SimpleswitchConstants.java 內被定義,因此可以直接使用來縮短程式碼長度。
import static me.louisif.pipelines.simpleswitch.SimpleswitchConstants.*;

final PiCriterion.Builder criterionBuilder = PiCriterion.builder ()
                .matchTernary (INGRESS_PORT, inPortNumber.toLong (), 0x1ff);
final PiAction piAction = PiAction.builder ().withId (MY_INGRESS_TABLE0_CONTROL_SEND)
        .withParameter (PORT, outPortNumber.toLong ()))
        .build ();
final FlowRule flowRule = DefaultFlowRule.builder ()
        .fromApp (coreService.getAppId (APP_NAME))
        .forDevice (deviceId)
        .forTable (MY_INGRESS_TABLE0_CONTROL_TABLE0).makePermanent ().withPriority (65535)
        .withSelector (DefaultTrafficSelector.builder ().matchPi (criterionBuilder.build ()).build ())
        .withTreatment (DefaultTrafficTreatment.builder ().piTableAction (piAction).build ()).build ();
flowRuleService.applyFlowRules (flowRule);
在範例程式碼裡面包含了簡單的 cli 指令實作,因此可以在 ONOS CLI 使用
add-pi-flow-rule <device id> <input port> <output port>的方式來下達上面的 flow rule。詳情可以 參考檔案。
當然這樣編寫出來的 flow rule 會產生一個問題,如果相同的 pipeline,我們希望能從 bmv2 移植到 tonifo 上面去使用,由於欄位的名稱會存在差異,因此所有下達 flow rule 的 APP 都需要重新寫,顯然這樣不是一個很好的做法,增加了程式碼維護上的困難,因此 ONOS 加入前面提到的 Interpreter 還有 translator 機制,下一節會介紹如何為 pipeline 編寫 Interpreter 還有用比較通用的方法來下 flow rule,在完成 interpreter 後上述的 flow rule,可以用下面這個我們比較熟悉的方法來下達。
private static final int TABLE0_TABLE_ID = 0;

final FlowRule flowRule = DefaultFlowRule.builder ()
  .fromApp (coreService.getAppId (APP_NAME))
  .forDevice (deviceId)
  .forTable (TABLE0_TABLE_ID).makePermanent ().withPriority (65535)
  .withSelector (DefaultTrafficSelector.builder ().matchInPort (inPortNumber).build ())
  .withTreatment (DefaultTrafficTreatment.builder ().setOutput (outPortNumber).build ())
  .build ();

flowRuleService.applyFlowRules (flowRule);
撰寫 Interpreter#
在前一節我們完成了基本的 pipeconf 註冊,並使用 PI flow rule 的方式來控制交換機,但是直接使用 PI flow rule 會降低 APP 的彈性,使移植到不同 pipeline 的困難度提高。另外 SDN 的一個特色是可以使用 packet-in/packet-out 的方式來讓 controller 即時性的處理封包,因此本結會介紹如何實作 Interpreter 來提供 packet-in/packet-out,以及 flow rule translation 的功能。
要提供一個 pipeline interpreter,我們需要實作 PiPipelineInterpreter 這個介面,要注意的是 Interpreter class 需要繼承 AbstractHandlerBehaviour,然後再 PipeconfLoader 去指定這個實作
public class SimpleSwitchInterpreterImpl extends AbstractHandlerBehaviour implements PiPipelineInterpreter {
}

PiPipeconf pipeconf = DefaultPiPipeconf.builder ()
        .withId (PIPECONF_ID)
        .withPipelineModel (P4InfoParser.parse (p4InfoUrl))
				.addBehaviour (PiPipelineInterpreter.class, SimpleSwitchInterpreterImpl.class)
        .addExtension (P4_INFO_TEXT, p4InfoUrl)
        .addExtension (BMV2_JSON, jsonUrl)
        .build ();
當一條 flow rule 被加入到 ONOS 時,PI framework 會將其翻譯成 PI flow rule,也就是將非 PI * 的欄位轉換成 PI flow rule 的欄位。
final FlowRule flowRule = DefaultFlowRule.builder ()
  .forTable (0)
	.withSelector (DefaultTrafficSelector.builder ().matchInPort (inPortNumber).build ())
  .withTreatment (DefaultTrafficTreatment.builder ().setOutput (outPortNumber).build ())
  .build ();
Table Id translation#
以前面提到的 port 1 送到 port 2 的 flow rule 來示範,我們需要把 table id 0,轉換成 PiTableId.of ("MyIngress.table0_control.table0") ,這對應到 Interpreter 的 mapFlowRuleTableId 函數,我們可以定義一個 map 來記錄,table index 跟 Pi table id 之間的關係,然後實作 mapFlowRuleTableId。這邊的 id 0 並不具有特定的意義,只是單純我們 interpreter 定義的 table index,因此當 APP 使用時,需要知道這個 index 對應到的 table 具體是什麼功能,當然通常我們會再加上一層 pipeliner,透過 flow objective 來隱藏 table id 的細節。
private static final Map<Integer, PiTableId> TABLE_MAP = new ImmutableMap.Builder<Integer, PiTableId>()
	    .put (0, MY_INGRESS_TABLE0_CONTROL_TABLE0)
	    .build ();

@Override
public Optional<PiTableId> mapFlowRuleTableId(int flowRuleTableId) {
    return Optional.ofNullable (TABLE_MAP.get (flowRuleTableId));
}
Selector Translation#
我們通常使用 DefaultTrafficSelector.builder 來定義 Selector。 matchInPort 會在 selector 內加入一個 PortCriterion ,他的 criterion tpye 是 Criterion.Type.IN_PORT ,為此 Interpreter 需要根據 Criterion type,將其轉換成 p4 table 對應的 key,同樣我們使用 map 的方式來維護其關係。
private static final Map<Criterion.Type, PiMatchFieldId> CRITERION_MAP =
  new ImmutableMap.Builder<Criterion.Type, PiMatchFieldId>()
          .put (Criterion.Type.IN_PORT, HDR_STANDARD_METADATA_INGRESS_PORT)
          .put (Criterion.Type.ETH_SRC, HDR_HDR_ETHERNET_SRC_ADDR)
          .put (Criterion.Type.ETH_DST, HDR_HDR_ETHERNET_DST_ADDR)
          .put (Criterion.Type.ETH_TYPE, HDR_HDR_ETHERNET_ETHER_TYPE)
          .build ();

@Override
public Optional<PiMatchFieldId> mapCriterionType(Criterion.Type type) {
    return Optional.ofNullable (CRITERION_MAP.get (type));
}
可能有些人會有些疑惑說,p4 table key 可能會是 exact 或是 ternary,那 ONOS 要怎麼把 matchInPort 轉換成 ternary mask 0x1ff
前面提到在註冊 pipeconf 時,我們透過 .withPipelineModel (P4InfoParser.parse (p4InfoUrl)) 載入 p4info (在 ONOS 內稱之為 PiPipelineModel),每個 key 具體的類型和資料長度會包含在 p4info 內,PI framework 在轉換時會根據不同 criterion type 和 key type 的不同和需求自動做轉換。
Treatment Translation#
不像 table id 和 criterion,在 p4 內,每個 action 是一個可帶參數的 function,和 ONOS 定義的 treatment 不存在簡單的對應關係,因此 interpreter 定義了 mapTreatment,輸入是 treatment 和 table id,輸出是 PiAction,讓 interpreter 完整的處理整個 treatment。
@Override
public PiAction mapTreatment(TrafficTreatment treatment, PiTableId piTableId) throws PiInterpreterException {
    // 檢查 table id 是否有效,由於只有 table0 一張 table,因此這邊直接檢查 table id 是不是 table 0
		if (!piTableId.equals (MY_INGRESS_TABLE0_CONTROL_TABLE0)) {
        throw new PiInterpreterException("Unsupported table id: " + piTableId);
    }
    // 我們的 pipeline 只支援 set output port 一個 instruction
    if (treatment.allInstructions ().size () != 1 ||
            !treatment.allInstructions ().get (0).type ().equals (Instruction.Type.OUTPUT)) {
        throw new PiInterpreterException("Only output instruction is supported");
    }

    PortNumber port = ((Instructions.OutputInstruction) treatment.allInstructions ().get (0)).port ();

    // 像 controller、flooding 這些特別的 port,稱之為 Logical port
    if (port.isLogical ()) {
        if (port.exactlyEquals (PortNumber.CONTROLLER)) {
            // 我們支援使用 send_to_controller 這個 action 將封包送到 ONOS
            return PiAction.builder ().withId (MY_INGRESS_TABLE0_CONTROL_SEND_TO_CPU)
                    .build ();
        } else {
            throw new PiInterpreterException("Unsupported logical port: " + port);
        }
    }

    一般的使用用 send 這個 action 來傳送封包 < br>    return PiAction.builder ().withId (MY_INGRESS_TABLE0_CONTROL_SEND)
            .withParameter (new PiActionParam(PORT, port.toLong ()))
            .build ();
}
到此我們已經完成了 flow rule 的轉換,可以使用 ONOS 標準的 flow rule 來操作 pipeline 了。
如果希望對轉換機制有更詳細的瞭解可以查看 ONOS 原始碼
Packet-in/Packet-out#
Interpreter 另外一個重要的功能是使 pipeline 支援 packet-in/packet-out 的功能。為此我們需要先修改我們的 p4 pipeline。
首先我們會先加入兩個特別的 header,並使用 controller_header anotation 標記,@controller_header ("packet_in") 來得知這個 packet_in_header_t 對應的是 packet-in 時,附加在這個封包的 meta data,通常會定義 ingress port 來表示封包的 input port。同樣的 packet_out_header_t 是 packet-out 時,ONOS 送來 pipeline 處理的 meta data
@controller_header ("packet_in")
header packet_in_header_t {
    bit<7> _padding;
    bit<9> ingress_port;
}

@controller_header ("packet_out")
header packet_out_header_t {
    bit<7> _padding;
    bit<9> egress_port;
}
接著我們要修改 header、parser,從 ONOS packet out 出來的封包對 p4 交換機來說相當於從特定一個 port 送進來的封包,因此一樣會經過整個 pipeline
以 bmv2 來說,controller 的 port number 可以自由指定,在我們使用的 p4mn container 內這個 port 被定義成 255,為此我們在 pipeline 的 p4 檔案內定義了 CPU_PORT 巨集為 255
我們將 packet-in/packet-out header 加入到 headers 內,當 packet-out 時,packet_out 會在封包的開頭,因此在 parser 的 start state,我們先根據 ingress port 是不是 CPU_PORT 來決定是不是要 parse packet_out header。
struct headers_t {
    packet_in_header_t packet_in;
    packet_out_header_t packet_out;
    ethernet_h ethernet;
}

parser MyParser(packet_in packet,
                out headers_t hdr,
                inout local_metadata_t meta,
                inout standard_metadata_t standard_metadata) {

    state start {
        transition select(standard_metadata.ingress_port) {
            CPU_PORT: parse_packet_out;
            default: parse_ethernet;
        }
    }

    state parse_packet_out {
        packet.extract (hdr.packet_out);
        transition parse_ethernet;
    }

    state parse_ethernet {
        packet.extract (hdr.ethernet);
        transition accept;
    }
}
在 Ingress 部分,如果是 packet-out packet,我們沒有必要讓他經過整個 ingress pipeline,為此我們直接將 egress_spec 設置為 packet_out header 內的 egress_port,然後直接呼叫 exit。
control MyIngress(inout headers_t hdr,
                  inout local_metadata_t meta,
                  inout standard_metadata_t standard_metadata) {
    apply {
        if (standard_metadata.ingress_port == CPU_PORT) {
            standard_metadata.egress_spec = hdr.packet_out.egress_port;
            hdr.packet_out.setInvalid ();
            exit;
        }
        table0_control.apply (hdr, meta, standard_metadata);
    }
}
我們的 table0 則加入了 send_to_cpu 這個 action,做的事情就是把 egress_spec 設定成 CPU port。
control table0_control(inout headers_t hdr,
                inout local_metadata_t local_metadata,
                inout standard_metadata_t standard_metadata) {
    action send_to_cpu() {
        standard_metadata.egress_spec = CPU_PORT;
    }
}
當封包要 packet-in 到 ONOS 時,需要將 packet-in header 設為 valid,並填入對應的資料,這個部分會再 Egress pipeline 完成
control MyEgress(inout headers_t hdr,
                 inout local_metadata_t meta,
                 inout standard_metadata_t standard_metadata) {
    apply {
        if (standard_metadata.egress_port == CPU_PORT) {
            hdr.packet_in.setValid ();
            hdr.packet_in.ingress_port = standard_metadata.ingress_port;
            hdr.packet_in._padding = 0;
        }
    }
}
最後為了讓 packet-in header 能後被傳到 ONOS,需要再 deparser 加入該 header,注意 packet-out header 是為了讓 pipeline 能夠根據該 header 來處理 pecket-out header 用的,因此他不應該被加入到 deparser。
control MyDeparser(packet_out packet, in headers_t hdr) {
    apply {
        packet.emit (hdr.packet_in);
        packet.emit (hdr.ethernet);
    }
}
接著回到我們的 interpreter,在 interpreter 內定義了兩個函數 mapInboundPacket 和 mapOutboundPacket,分別對應 packet-in 和 packet-out 封包的處理。先前我們在 p4 pipeline 定義了 packet_in 和 packet_out 的 header,這兩個函數最基本的功能是讀取和寫入這兩個 header 的資訊。由於這兩個函數的功能相對固定,因此可以直接從 ONOS 的 basic pipeline interpreter 複製過來修改。
@Override
  public Collection<PiPacketOperation> mapOutboundPacket(OutboundPacket packet) throws PiInterpreterException {
      TrafficTreatment treatment = packet.treatment ();

      // 由於 outbound packet 的內容通常不用在 switch 上在做修改,因此我們只需要取得
      //set output port 的 instruction
      // 當然如果有特別的功能需求,可以透過修改 pipeline 來支援更多 instruction
      List<Instructions.OutputInstruction> outInstructions = ...

      ImmutableList.Builder<PiPacketOperation> builder = ImmutableList.builder ();
      for (Instructions.OutputInstruction outInst : outInstructions) {
          ...
          // 這邊透過呼叫 createPiPacketOperation 來填入 packet_out header 的資訊
          builder.add (createPiPacketOperation (packet.data (), outInst.port ().toLong ()));
          ...
      }
      return builder.build ();
  }

private PiPacketOperation createPiPacketOperation(ByteBuffer data, long portNumber)
            throws PiInterpreterException {
        PiPacketMetadata metadata = createPacketMetadata (portNumber);
        return PiPacketOperation.builder ()
                .withType (PACKET_OUT)
                .withData (copyFrom (data))
                .withMetadatas (ImmutableList.of (metadata))
                .build ();
  }
@Override
public InboundPacket mapInboundPacket(PiPacketOperation packetIn, DeviceId deviceId) throws PiInterpreterException {
    Ethernet ethPkt;
    ...
    ethPkt = Ethernet.deserializer ().deserialize (packetIn.data ().asArray (), 0,
    ...
    //packet_in header 的資訊會以 key-value 的方式存在 packetIn.metadatas
		Optional<PiPacketMetadata> packetMetadata = packetIn.metadatas ()
                .stream ().filter (m -> m.id ().equals (INGRESS_PORT))
                .findFirst ()
    // 從中提取出 input port number
    ImmutableByteSequence portByteSequence = packetMetadata.get ().value ();
    short s = portByteSequence.asReadOnlyBuffer ().getShort ();
    ConnectPoint receivedFrom = new ConnectPoint(deviceId, PortNumber.portNumber (s));
    ByteBuffer rawData = ByteBuffer.wrap (packetIn.data ().asArray ());
    return new DefaultInboundPacket(receivedFrom, ethPkt, rawData);
    ...
}
到此我們已經完成了 interpreter 的實現了,Interpreter 目前還包含 mapLogicalPortNumber 和 getOriginalDefaultAction ,不過基本的 interpreter 不需要實現這兩個功能,所以這邊就不再展開介紹。
同樣使用範例程式碼時,可以在 ONOS CLI 使用
add-common-flow-rule <device id> <input port> <output port>的方式來使用下達 ONOS 標準的 flow rule。詳情可以 參考檔案。
撰寫 Pipeliner#
到目前為止我們已經完成了 pipeconf 的基本功能,可以下 flow rule 還有使用 packet-in/packet-out 的功能,不過到目前我們還是需要直接使用 flow rule,要知道 table id 對應的功能,為了能夠隱藏 table 的細節還有銜接 ONOS 內建的網路功能 APP,我們需要實作 pipeliner 讓我們的交換機支援 flow objective 的功能。
和 Interpreter 類似,我們需要實作 Pipeliner 這個介面並繼承 AbstractHandlerBehaviour 然後在 PipeconfLoader 透過 addBehaviour (Pipeliner.class, SimpleSwitchPipeliner.class) 的方式加入。
public class SimpleSwitchPipeliner extends AbstractHandlerBehaviour implements Pipeliner {
    private final Logger log = getLogger (getClass ());

    private FlowRuleService flowRuleService;
    private DeviceId deviceId;

    @Override
    public void init(DeviceId deviceId, PipelinerContext context) {
        this.deviceId = deviceId;
        this.flowRuleService = context.directory ().get (FlowRuleService.class);
    }
}
首先我們實作 init 方法,pipeliner 和交換機之間是 1 對 1 的關係,因此當交換機被初始化的時候,可以透過 init 方法取得 device 的 id。context 最主要的部份是使用 directory ().get 方法。平常我們在 APP 開發時是使用 Reference annotation 來取得 onos 的 service,這邊我們可以直接透過 get 方法來取得 service,由於 pipeliner 需要完成 flow ojbective 到 flow rule 的轉換,並直接送到 flow rule service,因此這邊先取得 flow rule service。
在 ONOS Flow Objective Service 的架構內,其實總共有三種 objective,分別是 forward、filter 和 next,他們都需要透過 pipeliner 來和 ONOS 核心互動,由於我們只想要實作 forwarding objective 的部分,因此 filter 和 next 可以單純回應不支援的錯誤訊息
@Override
public void filter(FilteringObjective obj) {
    obj.context ().ifPresent (c -> c.onError (obj, ObjectiveError.UNSUPPORTED));
}
@Override
public void next(NextObjective obj) {
    obj.context ().ifPresent (c -> c.onError (obj, ObjectiveError.UNSUPPORTED));
}
@Override
public List<String> getNextMappings(NextGroup nextGroup) {
    // We do not use nextObjectives or groups.
    return Collections.emptyList ();
}
接著就到了我們的主角 forward objective,在實作邏輯上其實與 interpreter 對 treatment 的處理方式類似,forward 方法會取得一個 ForwardingObjective 物件,我們根據 treatment 和 selector 生成出一條或多條 flow rule,然後透過 flow rule service 下放到交換機上。
@Override
public void forward(ForwardingObjective obj) {
    if (obj.treatment () == null) {
        obj.context ().ifPresent (c -> c.onError (obj, ObjectiveError.UNSUPPORTED));
    }

    // Simply create an equivalent FlowRule for table 0.
    final FlowRule.Builder ruleBuilder = DefaultFlowRule.builder ()
            .forTable (MY_INGRESS_TABLE0_CONTROL_TABLE0)
            .forDevice (deviceId)
            .withSelector (obj.selector ())
            .fromApp (obj.appId ())
            .withPriority (obj.priority ())
            .withTreatment (obj.treatment ());

    if (obj.permanent ()) {
        ruleBuilder.makePermanent ();
    } else {
        ruleBuilder.makeTemporary (obj.timeout ());
    }

    switch (obj.op ()) {
        case ADD:
            flowRuleService.applyFlowRules (ruleBuilder.build ());
            break;
        case REMOVE:
            flowRuleService.removeFlowRules (ruleBuilder.build ());
            break;
        default:
            log.warn ("Unknown operation {}", obj.op ());
    }

    obj.context ().ifPresent (c -> c.onSuccess (obj));
}
最後我們還需要實作 purgeAll,當刪除所有 flow obejctive 的時候,刪除所有的 flow rule,這邊我們只需要簡單呼叫 flow rule service 的 purgeFlowRules 就好。
@Override
public void purgeAll(ApplicationId appId) {
    flowRuleService.purgeFlowRules (deviceId, appId);
}
到此我們已經完成了整個 pipeconf 的實作,可以透過 flow objective 的方式來管理交換機並與 ONOS 內建的 APP 整合,因此我們可以透過使用 proxyarp 和 fwd 兩個 APP 來讓我們的交換機能夠正常的工作。
小結#
以上就是 ONOS P4 Pipeconf 的基本開發教學,使用的範例程式碼在 github,如果有遇到任何問題或有說明不清楚的地方,歡迎留言提問,我會盡力為大家解答。
參考資料#
https://hackmd.io/@cnsrl/onos_p4
https://wiki.onosproject.org/pages/viewpage.action?pageId=16122675
https://github.com/p4lang/tutorials/blob/master/exercises/basic/solution/basic.p4